

How to control analog gear remotely
Introduction, Hypothesis, Thesis, Synthesis
Part I
Making changes automatically – like adjusting volume levels – over the course of the song is called automation. Actually through automation you can tell your DAW to turn on or off some effect, change the volume as the track plays. The use of automation is not limited to level changing or switch control only. You can automate just anything like pan positions, the settings on plugins, levels of effect, just to mention a few.
In this article we will see how to combine the MIDI protocol together with a microcontroller and an ethernet lan.
Automation and analog recording
In the days of analogue recording, producers made adjustments to the mix manually as the final track was bounced. Nowadays you can simply instruct your DAW to make these adjustments for you. This gives you the potential to have multiple automations at the same time that can be repeated endlessly every time you want to play the track. Automation can be applied by performing it in real time or drawing the automation itself. Automation is something that you can just perform controlling parameters of DAW or plugins. Your DAW records the changes that are written and repeats them during subsequent playback. Automation is somehow being part of the project and performed together with the project as you recall it. No recall sheet are needed as the DAW records every parameter for you.
It’d be great if automation can be virtually extended to any physicalal device in the studio. I mean the analog hardware, whatever it is and whatever it does. The idea is not so new and some company have already physical analog outboard connected to the DAW; you can perform automations on the hardware thanks to dedicated plugins. It sounds great, though drawbacks are around the corner.
Pros & Cons
Everyone can see their own benefit but I’d like to focus on the drawback in order to try to go beyond the limits.
- Plugin to install: Usually there is a graphic interface you see on your screen that mimics the physical hardware. It’s a plug-in that helps you quickly pass parameteres to the hardware. Not a big issue, honestly, but yet another element among the bunch of plugins and windows crowding the project session on the DAW.
- Protocol: The pluging – and the DAW consequently – is comunicating parameters to the harware via a ‘language’ that the DAW is forced to speak. A protocol is just that, a list of rules the computer passes to the physical hardware in order to control it. A protocol implementation forces you to install a driver on your PC. Yet another driver running, another task for the CPU to process.
- Wiring: You have to physically connect somehow the hardware to your computer. That connection is usually a cable. Wireless connection is possible in the studio but, because of high frequency working devices, the risk of extra noise is too high, thus the old cable can be a more silent solution. Think about a microphone working close to a wireless device, maybe it can work fine, maybe not. The job in the studio is controlling the sound and you never let a noise controls/spoils your job. Wiring is definitely the answer, good quality cable but cable. Even though cables are good quality, you always have to deal with their maximum lenght as the communication PC- device have to be quick, correct and no data can be lost. Communication is intended both sides, of course.
- Cost: A language and rules have to be set in order to let the PC-device communicate. The company who decide to provide such kind of ‘interactive’ hardware have to provide a code, too. Thanks to the code, PC and hardware will talk together and thanks to the code the front-end of the plug-in and its functions will be ready for you mouse setting parameters. There is a cost for that: the research and development of the software. When you buy a remotely controlled hardware, you also pay for the technology that is behind it, the software.
Maybe the list of drawbacks can be longer but I guess it is long enought to take into consideration the counterpart.
What is black not necessarily have to be white, it can be non-black.
The non-black side of the matter sounds like a solution for remote unit management. With that said, let’s take a closer look at the generic specs:
- An easy to implement, fast to integrate, solid and tested software environment to develop hardware units on.
- Remotely managed parameters directly from a DAW
- Portable project that can easily suit every commercial or DIY design
- Everyone can use every single element as is or just custom it.
- No plug-in is mandatory for the control.
- Totally open source and totally open hardware project.
- No royalties and no hidden cost.
MIDI
A simple solution is the MIDI protocol.
My hypotesis: developement of an hardware that acts as translator of midi messages into automation.
When most people think of MIDI they think about keyboards or similar devices. But the great thing about MIDI is you can send/receive notes as well as commands; think about guitarist pedalboards connected via midi for preset changing, just to have a common example of midi used as a control. Any DAW manages with midi as it is a resident protocol. You can program it and it works together in syncro with audio tracks as part of the music project. Most people, talking about midi, think about DIN midi socket or USB connection.
Ethernet
 The MIDI signals can run over almost anything, over USB as well. USB has much higher bandwidth than traditional DIN-MIDI. The only issue with USB is that the cables have to be relatively short, which is a huge problem when you are in a studio. If our goal is remotely control the device, why should it be close to you? Because of cable lenght? It makes no sense. As the MIDI signals can run over almost anything, why not over ethernet.
The method of running MIDI over standard networks, like ethernet or even wi-fi is called rtp-MIDI (real time protocol) and that protocol is also built into all Apple devices – the protocol can be easily added to Windows computers as well – so, you probably already have a system at studio capable of running it.
![]() (click on the link for more in deep details about the great job Tobias Erichsen did)
(click on the link for more in deep details about the great job Tobias Erichsen did)
Ethernet is a very fast transmission system, but unlike USB, it is possible to use long cables. rtp-MIDI has built-in latency compensation, therefore, no matter how many MIDI devices you are running, timing is super tight. rtp-MIDI also runs over the internet router or any standard ethernet switch, using any normal ethernet cable.
In the studio
Engineers in the studio are used to connect one piece of hardware directly to another, it’s a straight line from an output to an input: a cable that connects a microphone to a preamp then to a mixing desk then to an AD converter. This is what we call a point-to-point connection. DIN-MIDI is an example of point-to-point connection, too.
MIDI over ethernet doesn’t have to be a point-to-point connection.
Ethernet is designed to have multiple connections between all devices in a network. More than one pc or more than one device can be connected each other via an ethernet switch in a star configuration. It also allows you to use multiple devices at the same time and transfer MIDI data between them. As a new device will reach your studio, just connect it to a free port on the ethernet switch and immediately it will be ready to work.
No specific network hardware for your MIDI gear is needed. It’s possible to connect computers and interfaces to any standard ethernet switch.
All you have to do, then, is to sent MIDI command and to which device. rtp-MIDI uses a system of virtual MIDI cables that your computer uses to route MIDI signals among devices. You get all the advantages of having hundreds of possible connections without hundreds of physical cables messing the studio up.
Scalability, expandibility. As you probably know, USB/DIN-MIDI is limited to a maximum of 16 MIDI ports per cable but the number of virtual ports you can have on an rtp-MIDI network is actually unlimited.
Ethernet is capable of carrying thousands of MIDI channels down one single cable, so an rtp-MIDI network is infinitely expandable. If a device, for example, handles 8 virtual rtp-MIDI ports and 16 channels per port, it means you can deal with (8×16) 128 MIDI channels in total. In such scenario, adding more than one device is not a problem at all.
workflow
Coming back to the drawback list: plugi-in, protocol, wiring, cost. Let’s analyze:
- No plug-in is needed as you can send/receive midi command in a midi track on the sequencer.
- No extra drivers are needed as any DAW has built-in midi protocol on it.
- Wiring is not a problem as the cable can be extended over the limit of current DIN-midi or USB lenght. A WiFi can be even used to carry midi information.
- No extra cost for software development is needed as the MIDI is a worldwide standard.
The next part will be a bit more specific as we’re going to set up both hardware and software guidelines in order to get our rtp-midi audio automation device.
hardware and software guidelines
Part II
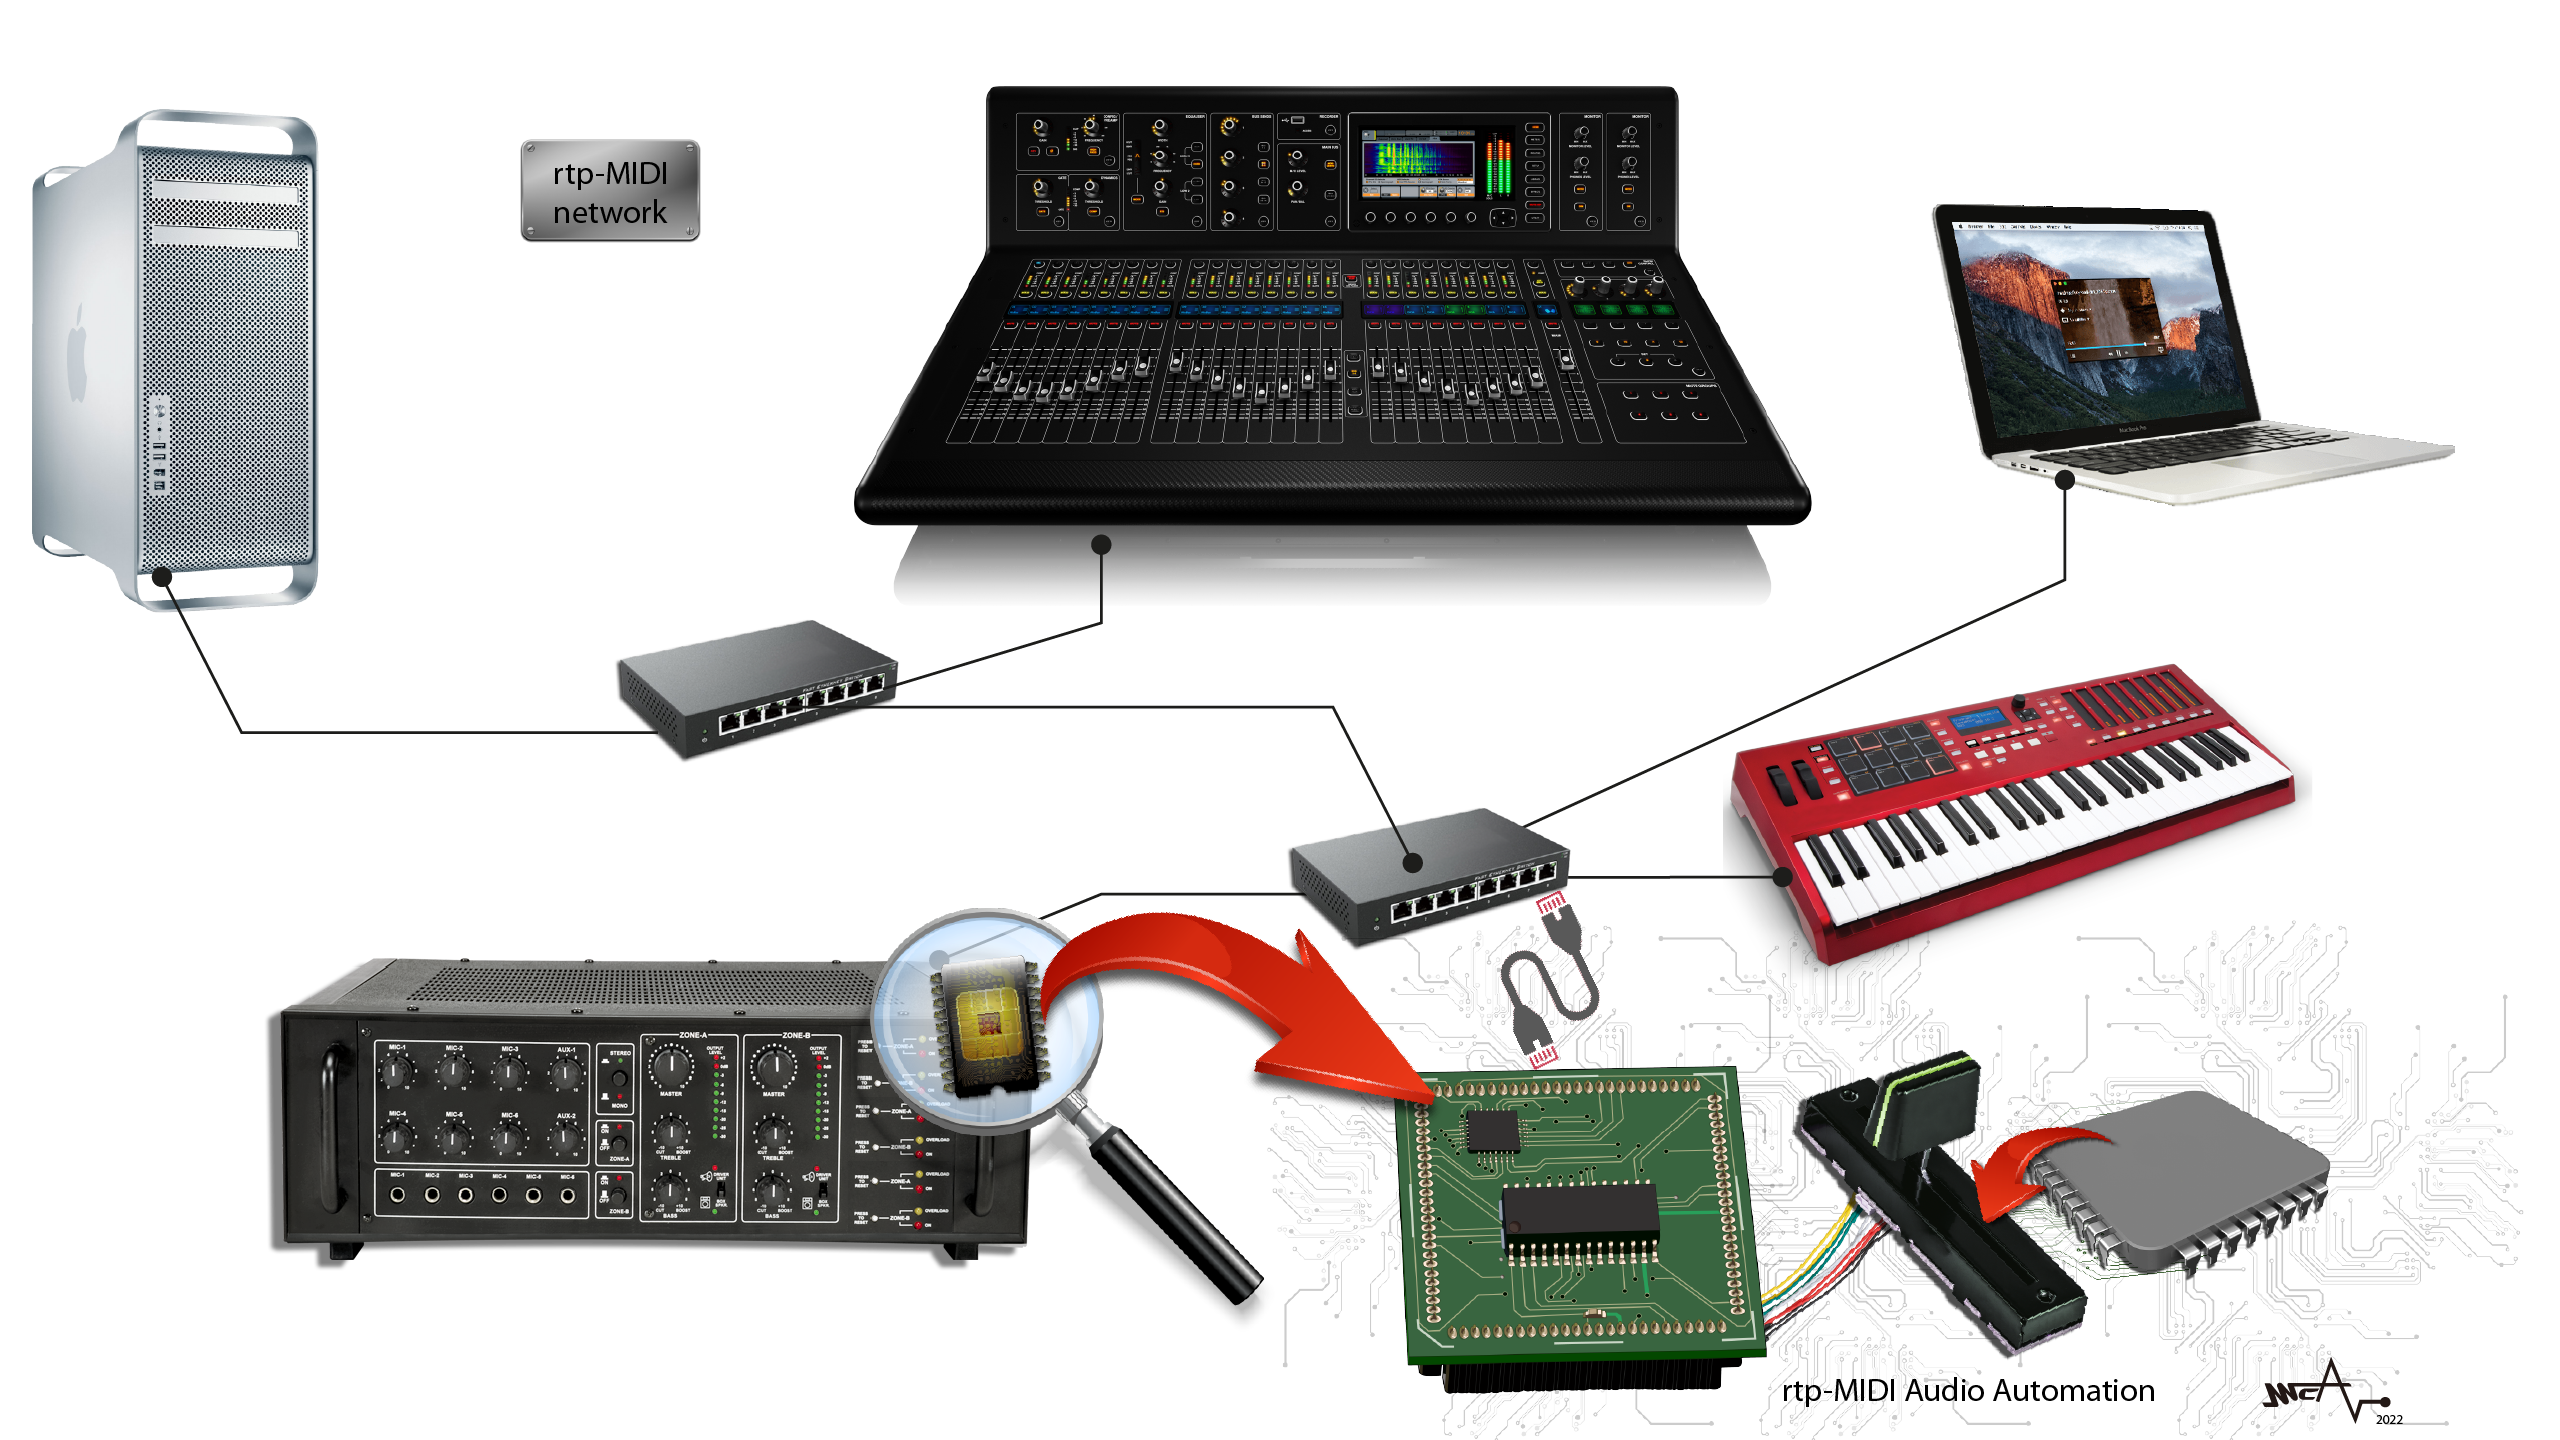
Our goal is the development of an embedded automation board for audio device control. Below the three main items to focus on:
- Getting the MIDI information from a LAN:
An ethernet device is used to interface any MIDI devices with the Local Area Network (LAN). It allows to connect a DAW through existing LAN infrastructure (avoiding long DIN/USB-MIDI cables); the interconnection of applications running on mobiles as well as laptops, tablets or smartphones with legacy MIDI devices is possible .
- Decoding the MIDI message:
A microcontroller (MCU) is used on this step. Its job is the core of the whole project as, thanks to the firmware, the MCU decodes a valid MIDI message into something exploitable for audio automation.
- Controlling specific devices:
The microcontroller is also the chip that controls the phyisical electronic devices attached to such as motorized faders, DAC, Relays and so on.
The board is an embedded system equipped with both ethernet controller chip and MCU. A connector features the board as an easy to integrate hardware component. The idea behind is the flexibility of the design in such a way you can suit it on every project you are working on. Just the firmware must be adjusted to meet your needs. Becouse of high frequency digital devices, the board will be designed to minimize the RF noise and making it transparent to audio signals.
A block diagram let you better understand each single step. The boards includes all electronics components. The RJ45 ethernet jack connector is provided. The connection to the audio device take plase by a board-to-board or cable-to-board connector
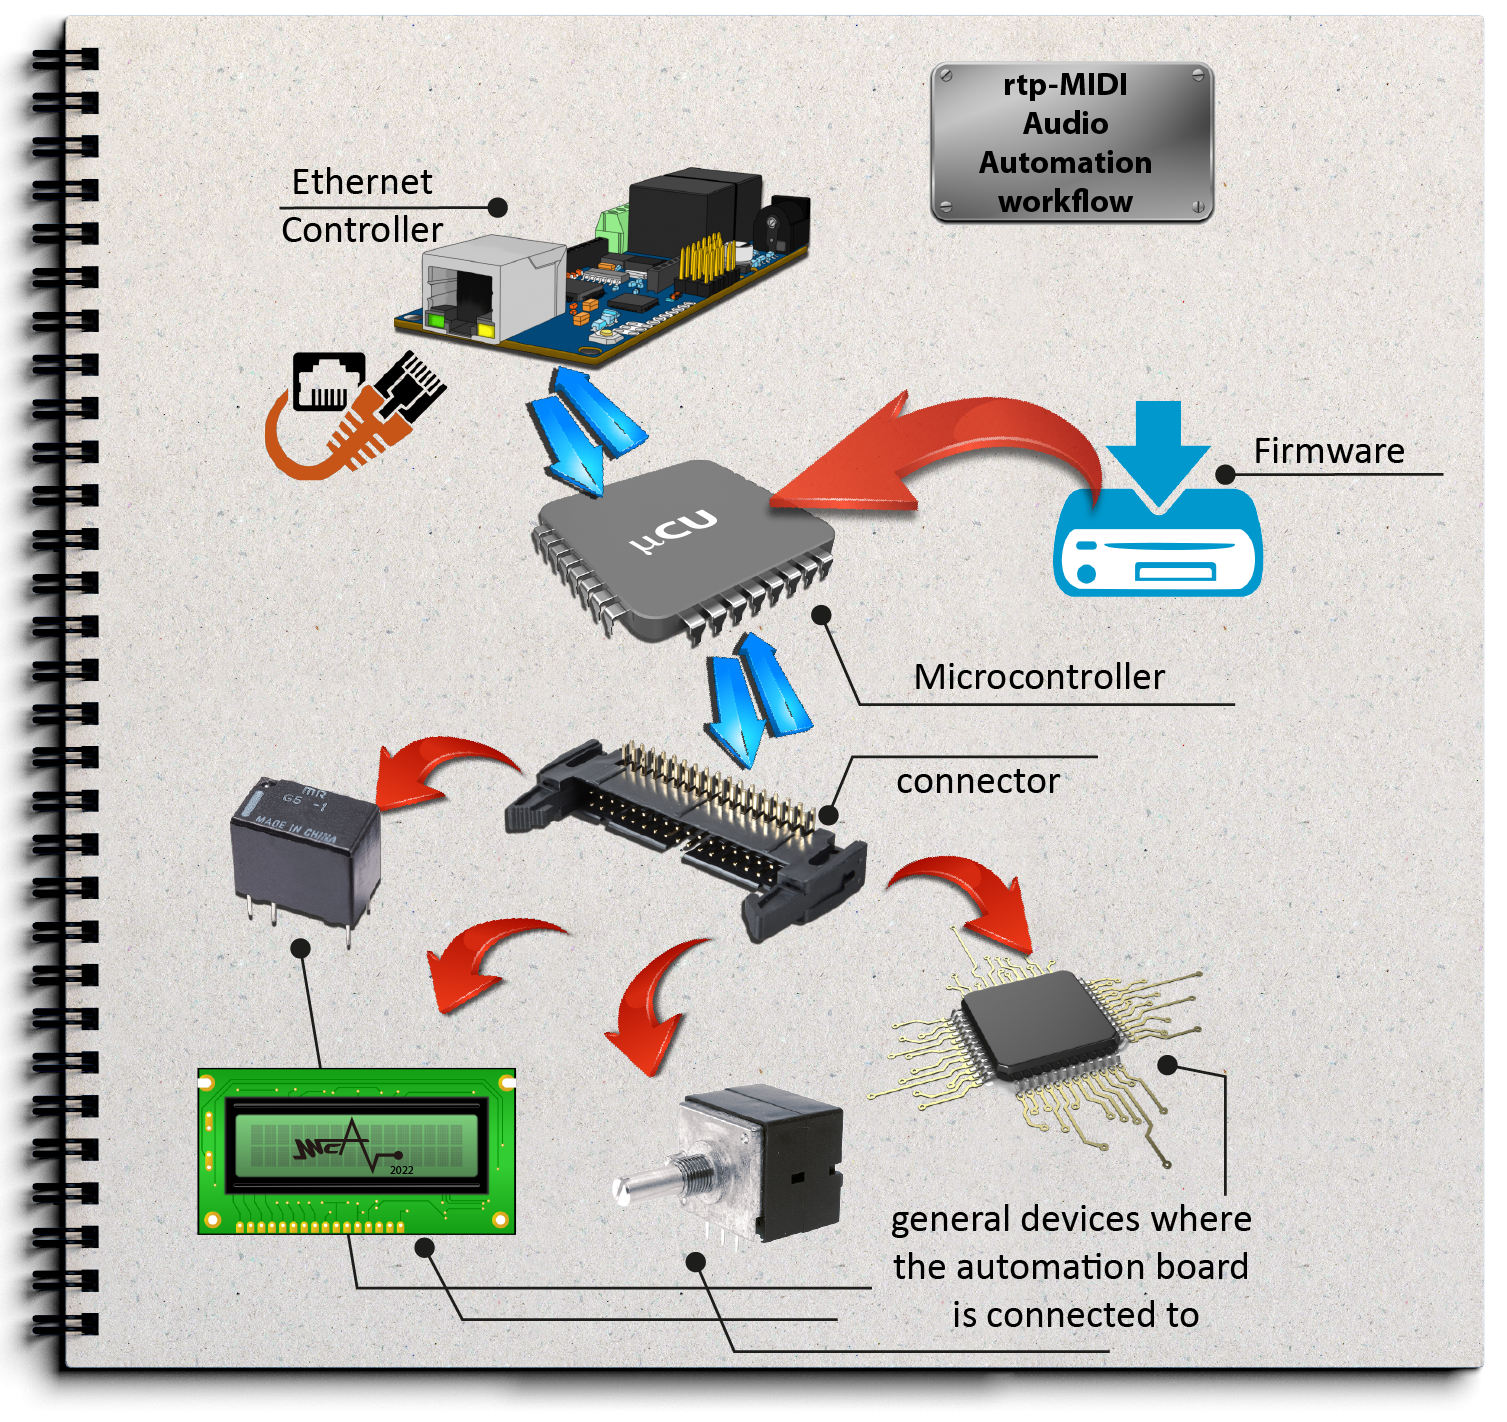
Microcontroller
The MCU is the most relevant part of the project and I start a more-in-deep description just from this component.
My choice is the Microchip ATMEGA2560. This chip has enought digital input/output pins available, large enought flash memory and it is easy to program.
The firmware is an open source C/C++ code. Given that, the choice of the Arduino IDE – Arduino Integrated Development Environment – platform is suggested by the worldwide community of makers that use Arduino for their projects development. Arduino IDE platform is not mandatory and different developing platforms can be used, of course. Nowadays the implementation of various device controlled by the popular 5620 MCU is common and an active community can help. Countless examples of code can be found on the web too for every specific application. The project have to be open, easy, democratic and – why not – educational oriented.
Our rtp-MIDI audio automation board uses the DHCP service thus the network ‘see’ it as a devices such as ethernet switches, routers through its own IP number. Details and specs about the firmware code can be found on the GitHub MCAudioLab repository. The code is free and everyone can (re)use it or just change it to meet their own requirements. Every single software element is free and libraries are taken from the official Arduino library list. The rtp-MIDI library especially deserves a specific mension, thanks to the grat Tobias Erichsen’s job. In order to upload the firmware, just a single inexpensive USB to Serial converter is needed as external device.
The converter allows communication between two popular serial interfaces USB (computer side) and UART (MCU controller side). Thus no USB port is on the board and the firmware upload/update relies on the MCU serial port.
Ethernet controller
The Ethernet controller is based on the WIZnet W5100 chip that is a hardwired TCP/IP embedded ethernet controller. It enables easier network connection for embedded systems with a minimum external components count. The W5100/ethernet is also supported by a library for the 5260 MCU and together are a perfect team for a LAN communication system. The comunication between the ethernet controller and the MCU is based on the SPI protocol hard-wired on the board.
Connector
The connector is the physical data bus to and from the embedded MIDI audio controller board and your audio device. It’s primary function and directly wired to the MCU. It couples with external circuitry..
The connector pinout is the one and only you have to provide designing your audio device. It should work likewise an expansion card (the rtp-MIDI audio controller) fitting into the motherboard (your audio device).
All connector pins can be freely assigned as ‘expansion’ for further devices will equip your audio unit or they may be just one type of I/O used among several such as digital/analog signal I/O, PWM and serial communication controllable by the DAW at runtime after a valid incoming midi signal. Specifications for the pcb footprint connector and pins name are supplied on a specific file on the GitHub repository.
Firmware
The firmware is a code you will adjust according to the harware you decide to use. Some want to control a motorized fader, some a VCA, some just a relay. The possible scenarios are countless that’s why the code for firmware we supply is generic. We rather give you a starting point but the specific fuction for that specific control or electronic device is up to you. You will go through the information in depth on the MCAudioLab (GitHub) repository where a sketch has been published.
Hardware
The board consists of a PCB with both an ethernet processor and a programmable microcontroller plus all electronics components needed by that two chips for working and one ethernet RJ45 connector. A fully assembled board will be available as well as Gerber files and BOM list.
How to use the project
MIDI Audio Automation means digitally controlled analog equipment. It’s important to underline that digital and analog domains remain adsolutely separated. The Analog equipment can have its various parameters and functions altered by a digital control system. The digital is what replaces your hand turning a knob or activating a switch. What is analog keep on being analog. That said and as many time mentioned before, both hardware and software are free to use, embed, copy, customize, etc. The whole project is available as physical hardware plus software code as well as schematics and Gerbers for the fearless makers. The rtp-MIDI audio Automation project is the trigger to let the huge comunity of DIY audio geeks embedding new features on their own audio designes. Professional audio companies are welcome to use the project too. Does not matter whether you are a company or a bridge player, just one rule only you ought to observe: mention MCAudioLab and this article – as the midi audio automation project repository – on the web and socials.
it’s an ethical duty!
Note:
We are working on a specific article, soon available. All schematics, board and details, code, design and every part of the rtp-MIDI Audio Automation project is being available on the MCAudioLab GitHub repository. Be sure to keep yourself posted about upgrades and updates. Joining the community. Your advices are welcome as well as ideas and improvements. Feel free to leave a comment and keep on following us here and on socials too.
Resource Lists
In addition to the resources listed below you can also check whether your local library will be holding any publishing about specific subjects.
MIDI: https://en.wikipedia.org/wiki/MIDI
rtp-MIDI: https://en.wikipedia.org/wiki/RTP-MIDI
Microcontroller: https://en.wikipedia.org/wiki/Microcontroller
Atmega2560: https://www.microchip.com/en-us/product/ATmega2560#document-table
WIZnet W5100 https://www.wiznet.io/product-item/w5100/
All trademarks mentioned in this page are used for identification purpose only and are properties of their respective owners.
